It is not as impossible as you might think.
You can read about keys to a great website or is your website built right later but lets get started on building you a website. I will take you from A-Z and provide links that will help get you going.
Step 1 You can either decide on a domain name or setup your hosting first. Your choice, but you need both and I suggest never using the same company to both buy your domain and also host your website.
Domain name-This is what your website address will be.
For example: bestlexingtoncarwash.com or bestlexingtondentist.com -this is what your domain name is and I prefer using Godaddy.
Every website needs a hosting provider. Basically, you buy the domain name you want then you pay a hosting provider so your website is made live on the internet. I prefer Hostgator but there are numerous ones to choose from. Hostgator is very popular and I have nothing but great experiences using them.
So you have your domain and your hosting now what?
1. Log in to your Godaddy account and under Domains > Domain Management you will see your newly purchased domain.
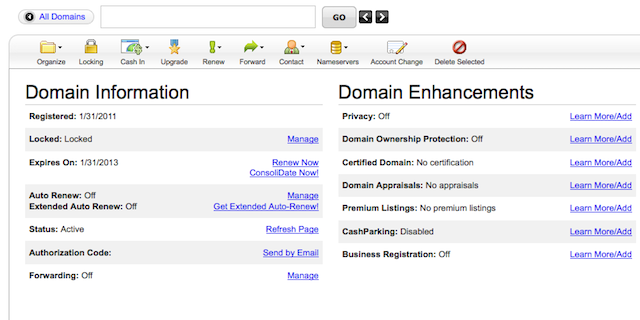
2. When you click on your domain inside your Godaddy account you will see a page like the image below.
3. There will be a whole bunch of options, confusing things but just concern yourself with the button that says Nameservers.
4. Sign in to your Hostgator account which can be accessed by typing in your domainname.com/cpanel. Replace domainname with what your actual domain name is.
5. Scroll down the Hostgator cpanel and on the left hand side you will see information that says Nameservers. Probably something like ns2020.hostgator.com and below that will be ns2021.hostgator.com. Both are made up but your nameservers will be close to the same format.
6. Go back to Godaddy and click on the nameservers > set nameservers. Take your hostgator nameservers and add them to your nameservers replacing any default info you may see. You need to add both nameservers and click on I have specific nameservers for my domains. this will tell Godaddy to point your domain in the direction of Hostgator.
7. Go back to your Hostgator account and the image below resembles what you see in your cpanel. Just click on add on domain under the domain section.
8. Once you have clicked on addon domain you will see a page like the image below.
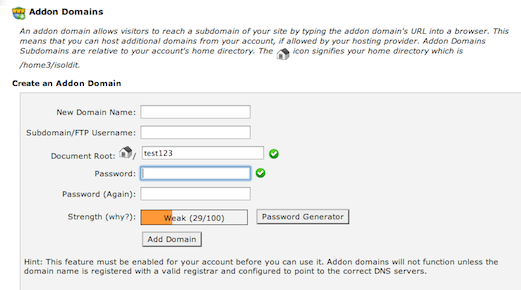 9. The default stuff will be there so just concern yourself with the New Domain Name space and password. Once this is set click add domain and your good to go!
Set back take a deep breath, you now have a live website domain name. Take it all in as you have just completed something most small business owners can’t do. It may take hours for all the Internet servers across the world to see your website address but its there even though it’s still empty at this point.
Now for the fun part
I’m assuming you have Hostgator hosting for the instructions below but all cpanel logins should be just about the same.
You have your domain setup with hosting but you have a blank page. First, decide on the basics.
1. Make a list of your information you want on your website -pages for example that are Home, Contact Us, About Us, Products or whatever you want.
2. You will need content but that’s where your creativity comes in.
3. You have a couple options like HTML templates or WordPress.
I suggest WordPress since this could be your first time setting up a website.
But you can find HTML templates everywhere including right on Hostgator. HTML is a coding language that you learn but templates help you basically plug and play your way to building your website. Both HTML and WordPress have advantages and disadvantages, BUT adding content or changing content in WordPress couldn’t be easier.
On the Hostgator dashboard there will be selections like this.

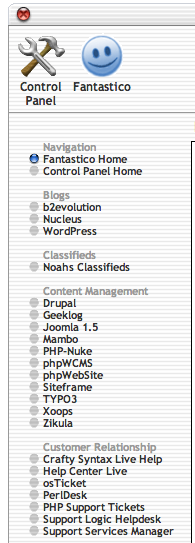 1. Log back into your Hostgator account and find Fantastico De Luxe under Software/ Services. When you click on Fantastico it will take you to a page that has whole bunch of info but just look on the left and click on WordPress.
2. The next page will have choices like New installation. Simply click on new installation and setup your new WordPress installation. Don’t worry about the Install in directory -thats for more advanced stuff so leave it blank.
3. Be sure to add a user name and password under Admin access.
4. Choose a nickname and fill in your email. Your site name and description can be changed once your into your WordPress.
5. Once you click install your almost done. Once you get the successful setup screen you should be able to use your login and password you created to access the Worpdress dashboard.
You now have a website with a domain name and the default WordPress theme on your homepage. WordPress is customizable in almost every way so play with it and learn.
Happy website building!
